Chocobo are creatures that you can grow to develop your own personal transport. These friends can boost you with abilities acquired through breeding and ranking up the potential of your Chocobo. Note that a white Chocobo is a requirement to collect certain items behind untraversable terrain.
Why Use a Chocobo?[]
Chocobo are a means of traveling through terrain that is otherwise inaccessible. They also are a requirement to unlock and participate in the Chocobo Cup in the arena. They also are the way to acquire certain items in the armory. And they can help you in battle once they've acquired certain abilities.


A potential is a number that influences the effectiveness of breeding with different Chocobo and the abilities that are related to that number. Read the abilities section below.
Digging is one of the main uses for a Chocobo as it is the only way to collect certain items for the armory. There are specific locations for digging that are listed below or in the armory section that tell you where. There's also the randomized digging for other valuables or the greens used to upgrade the color of your Chocobo. Read the digging section below.
Once a Chocobo have changed color, they change the types of terrain they can travel through. Read the breeding value section below. Read the color type section below.
Color Types[]
This is one of the main uses for a Chocobo as the ability to transport you across terrain is very useful in different situations. The color type is what determines what types of terrain it can traverse.

From Left to Right "Master", "Tier 3", "Tier 2", "Basic" Chocobo. There are 4 types of Chocobo in total.
Yellow - Basic - Used as a breeding base
Blue - Tier 2 - Can walk on water
Red - Tier 3 - Can fly over terrain
White - Master - Can move through anything (like the blacked out walls) unimpeded
To upgrade the color or "tier" of a Chocobo they must be fed greens. See below
Greens[]
Gysahl greens is the first tier and found to teach you how to dig during Billy's quest in the Farm area, specifically the rabbit's pen. Afterwards, it can be found randomly across Gaya.
Feed a Gysahl green to Boco (beside Ao Madoushi) to upgrade all the greens on the map to Mimmet Greens.
Boco will then disappear and show up in Elysium.
Find Boco in Elysium with a Red Chocobo and dig in front of him to unlock Sylkis Greens
Sylkis greens can be used to go from yellow all the way to white but it would take 3x Sylkis, Mimmet can only go up to red, and Gysahl can only go to blue max.
Upgrading from Yellow to White Chocobo[]

FFERPG Chocobo Upgrading- Yellow to White
From Yellow to White Chocobo
Nut types[]
Nut Types are rated on a scale of 0 to 3
| Nut Type | Rating |
|---|---|
| Pram Nut | 0* |
| Luchil Nut | 1 |
| Carob Nut | 2 |
| Zeio Nut | 3 |
*Pram Nuts can't be used for breeding.
Nut's are acquired through stealing from Chocobo, killing Chocobo, or completing Billy's quest which either unlocks after completing Last Rites or bringing him a captured Chocobo. The purpose of the nuts is to capture or breed Chocobo.
There's a Bazaar Goods recipe for selling 1 Pram, 1 Luchil, and 1 Carob Nut for a Zeio Nut.


Digging[]
One of the main uses for a Chocobo is it's ability to Dig for items or other loot. To dig with a Chocobo you must feed them Dead Peppers which are acquired through Billy. You essentially play a "Hot and Cold" game and must pay attention to the reaction of the Chocobo. There are items buried around the world in random fixed locations, meaning they can always be found in the same spot, but the digging locations differ per game.
Usually digging is hard to learn for new players, because its hard to tell if you're doing the right thing. Billy's quest teaches you the basics of digging by getting you to use dead peppers within the farm. The Gyshal Greens are found within the rabbit's pen and the purpose of the quest from Billy is to learn the "Hot and Cold" game. Use a few dead peppers far away and as you move deeper in the pen to see the examples of text below. You'll need to get used to the changes in Wark's as the digging locations below are somewhat randomized for each playthrough. There are set locations though for the equipment gained through digging.
| Reaction | Distance | Analogue |
|---|---|---|
| Waaaaark | Far (~In other location) | Cold |
| Wark! | Medium (~In same location) | Warm |
| Wark!! | Near (~Around) | Hot |
Dig spots are never deactivated they just get moved to somewhere random in the entire map. So if you still need greens to upgrade your Chocobo for instance then you can go back through areas you've already searched for more loot.
*The corrupted orc island, behind the icy gate area, and the new Arcanite Mine did not have any dig spots when tested.
Possible Digging Locations
These have been tested in .9.7.2 if anyone finds the same spots and loot or different spots and loot please let us know in the Discord wiki channel.
Armory Item's
- Island south from Omega Weapon (Curse Scroll: Staff of the Magi)
- Underneath Ramuh near the summoning tower (Storm Lance)
- West of the farm after completing Last Rites are graves and digging while at the graves is (Wirt's Leg)
- The most southern peninsula in the Dark Dragon Marsh (Fairy Doll)*
*Quest Item for Pupu related to the friendly monsters.
Guardia Forest
- Behind the trees where the Dark Goblin spawns (Forest Essence x 7)
- Near the Kalm entrance on the North side in-between the two sets of trees (Greens)
Barrens
- Right from the forge, below the cactus (Barrens Sand x 7)
- North-East from Tindalos where the ground starts to lower (Turbo Ether x 25)
- Below the mountain with the cave, right of where the Storm Hide Lizard spawns (Crystal Pieces worth 6 shards)
Central Island
- Below the Mithril Golem box to the left of the coral (1500 gold)
- Below the Mithril Golem box above the coral (Spirit Potion x 15)
- Above the Mithril Golem box (Blood Ether x 30)
- Center of the island to the left of the two large sets of trees (1500 gold)
- Below number 3 and directly East of the Mithril Golem box (Crystal Shard)
- Below the golden statue that is below the Mithril Golem box (Elixir x 5)
- To the east of the bridge (Remedy x 33)
- To the left of the bridge and slightly below (Greens)
- To the left of the bridge near the water entrance (Tropical Essence x 7)
- Below 8 or just behind the large set of trees in the bottom left of the island (Remedy x 18)
- Slightly lower than 9 (1000 gold)
- To the right of the large set of trees and directly below the bridge (Hero Drink x 24)
Northern Mountain
- Above the Materia Obelisk (Nectar x 30)
- Underneath where Typhon spawns (Mine Mineral x 8)
- Below the brothers at the center of the U shape in the dirt road (Luchil Nut x 7)
- In the center of the large area below Ro'gall where the road creates a Y shape (Greens)
- To the left of the Arch connecting Northern Mountain to Guardia Forest (Crystal Shard)
- Below Ramuh near the summoning tower (Storm Lance)
Farm
- In the corner of the rabbit camp (Greens)
- West of the farm, at the graves after completing Last Rites (Writ's Leg)
- Where Cu Chulainn spawns in the corner of the dirt (1000 gold)
- To the right of the 5 dead bodies where you meet Mr. X (Luchil Nut x 7)
- On the right side of Agrias' Tower (Wild Soul x 7)
- Above Gafgarion, where the line of trees stops (Greens)
- On the backside of the trees by Adria (Greens)
- At the destructible rocks closest to the entrance to the bloodstone golem (Crystal Shard)
Naga Island
- To the right of the top right vault (Hero Drink x 14)
- To the left of the shipwreck near the coral (Hero Drink x 24)
- Below the palm trees near the Dragon Marsh entrance (Greens)
- In the bottom right to the left of the coral (Theurgic Water x 7)
- Below the golden statue (Hero Drink x 24)
Lothlorien Forest
- Below the fountain (Remedy x 33)
- To the left of the fountain past the trees (Greens)
- Below the Great Tree (Ancient's Spirit x 7)
- In-between the two sets of trees below the Great Tree (Luchil Nut x 7)
- To the left of the vault at the top of the area (X-Potion x 25)
- Below the triangle of logs at the trees beneath (Blood Ether x 18)
- West of Kenarius, above the first set of trees (Greens).
Snowy Mountains
- Near the gate directly East of Mae'chen (Greens)
- South-East from 1, in the middle of the path directly East from the warrior class changer (10000 gold)
- To the right of the ice crystals that are south from the peak of the mountain (Luchil Nut x 7)
- If you go South from the right wall of the mountain peak its in the middle of the path (Greens)
- Below the teleporter in that alcove in the bottom left of that alcove (Pram Nut x 6)
- West of the circle of trees South-East from Demesne below the line of trees leading up to Echele (Spirit Potion x 18)
- Same spot (Greens)
- Bottom left of the ice crystals that are just before the entrance up to Echele (Crystal Pieces worth 6 shards)
- The hill to the right of the circle of trees (Hero Drink x 24)
Dark Dragon Marsh
- The most southern peninsula (Fairy Doll)
- To the left of the pond near the bottom of the area (Crystal Shard)
- Underneath the invisible box (1500 gold)


Almost all digging spots seem to be random if not related to a specific drop like the Armory items (in comparison to the number of location found).
Breeding Basics[]
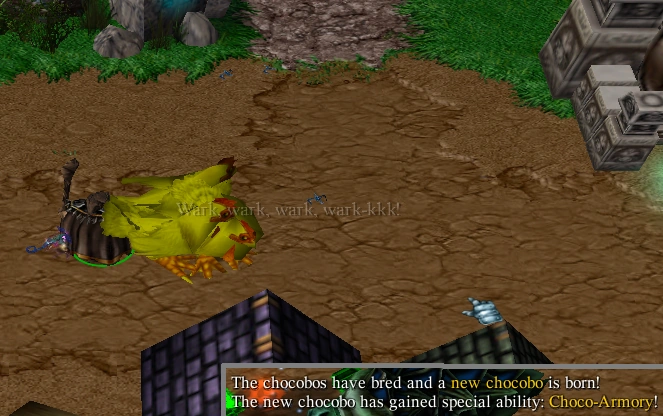
Once you have two Chocobo you can breed them by taking Chocobo A and Chocobo B and putting them near each other then using a Tier 1 or higher Nut to create a third Chocobo. The potential of a Chocobo is the determining factor in the abilities that the Chocobo can acquire. The ability's that a Chocobo has will determine it's usefulness for helping you in combat like having extra armor from having a Chocobo with you.
Breeding Value[]
Chocobo bred gain a value based on this equation:
(Chocobo A's Rating) + (Chocobo B's Rating) + (Nut's Rating) = (Chocobo C's Value)
This gives an outcome of 12 different types possible since chocobo value can vary from 3 to 15. A bred Chocobo value dictates the type of ability it gets and its total potential for growth.
| Value | Ability |
|---|---|
| 3 | Quick Fast Join |
| 4 | Shadow Mimic |
| 5 | Trickster's Sprint |
| 6 | Regeneration |
| 7 | Teleport |
| 8 | Feather Aura |
| 9 | Chocry |
| 10 | Choco-Armory |
| 11 | Chocobo Slow |
| 12 | Choco-Banish |
| 13 | Chocobo Haste |
| 14 | ChoCommander |
| 15 | Attack |
Abilities[]
The color or tier of a Chocobo determines the level of it's abilities.
| Ability Name | Ability Description | Ability Rank 1 | Ability Rank 2 | Ability Rank 3 | Ability Rank 4 | Ability Rank 5 |
|---|---|---|---|---|---|---|
| Quick Fast Join | Fast Join with a shorter Cooldown | 25 Second Cooldown | ||||
| Shadow Mimic | Allows a Chocobo to hide at night | Untested | No Noticeable Change | |||
| Trickster's Sprint | Untested | Untested | ||||
| Regeneration | Allows a Chocobo to recover a portion of life | 2000 hp
60 s cooldown |
||||
| Teleport | Allows a Chocobo to teleport to any target in range. | 10s cooldown | ||||
| Feather Aura | Movement and Attack Speed increase aura | Att Speed 4%, Movement 20% | ||||
| Chocry | Taunts Non-Hero enemies to the Chocobo | 3 Targets
(16s cooldown) |
6 Targets | 9 Targets | 12 Targets | 15 Targets |
| Choco-Armory | Allows a Chocobo to Defend | 25 armor | 30 armor | 35 armor | 40 armor | 60 armor |
| Chocobo Slow | Reduces enemy Movement and Attack Speed | -30% attack speed, -50% movement speed, 6 second duration | ||||
| Choco-Banish | Turns an enemy non-hero Unit ethereal and reduces movement speed by 50% (5s cooldown) | 15 Second duration | 18.75 Second duration | 22.5 Second duration | 26.25 Second duration | 30 Second duration |
| Chocobo Haste | Increases an allies Movement speed by 50% and Attack Speed by 100% | 4 second duration | ||||
| ChoCommando | Melee attack damage aura | 5% Melee Attack Damage | 10% Melee Attack Damage | 15% Melee Attack Damage | 20% Melee Attack Damage | 25% Melee Attack Damage |
| Attack | Allows a Chocobo to attack without a rider! | 561-586 damage
(1920 DPS on scarecrow) |